
DRY ROT
If the guides are showing even a little bit of dry rot, you can rest assured that the rest of the wood will deteriorate rapidly from this infection. The only remedy for dry rot is replacement. One can only question why the guides were made of wood construction when they are always going to be in a moist, poorly ventilated environment when the boat is in the water. The wood might have a life expectancy of only 20 years where as the fibreglass might have a life span of 100 years.
Outlined below are several tales of coping with the repair of the centerboard guides.
FROM CHRIS HOLDERNESS
Hi Onde.I had to replace my guides. I knew they were rotten because the top part of the wooden frame pulled down about a inch because the bottom was rotted. This actually caused the cabin top to flex excessively and crack because the DPO sailed it like this!
I removed/replaced from the top but others have opened up a section of the bottom slot to get the old ones out. I didn't like the idea of weakening an area the designers had obviously thought important enough to make so thick in the first place. But - you need to cut the old guides to get them out from the top. No cutting of the fibreglass trunk - just the wooden guides. Even at that, I had to lever them out with a crowbar (from the top) as they were glassed in during manufacture. It wasn't that difficult because of the condition of the wood.
At this point, you have to make a decision as to material. Many people have used plastic HDPE material. This is extremely stong and will support the compression loads of the mast. It has a little bit of flex which will allow you to get the new ones in place in one piece. But - this material is much softer than oak and the keel plate will grind into it if not smooth - or balanced. Lorne's "balance" information is very important if you use HDPE.
I chose to replace mine with the original material - white oak. I had a wood specialty shop cut and route the slot. Expensive stuff - just the wood was $150. I was told that white oak will last 20 years without dry or wet rot problems. Unfortunately, an act of God can't bend the stuff - so I cut them in two, about 12 inches from the top. I then drilled a 3/8 hole 6 inches into each piece for a titanium rod. I then routed a slot for a stainless joiner plate on the front and back of each piece. In hindsight, the rod was not really required. The loads are compression so the plates only serve to keep the pieces aligned. I had to shape the bottom of each guide until it fit (with gentle hammer blows) into the boat. This was a pain as my guides tapered both ways and were rounded at the bottom. Be sure to continually measure the width so you don't go too far!
Other advice? Lifting the boat was a pain! I fabricated a lifting rig from industrial shelving, tow motor lifting straps and chain hoists. Didn't end up using this as it just didn't feel sturdy enough. Ended up using a friends tow motor with cargo straps. It was an eyeopener trying to drag the keel out from under the boat - it doesn't look like it should be so heavy. Two of us could barely drag it clear!
It was a lot of work but needed to be done. I don't think the new owner fully understands the amount of work that I've saved him! Hopefully, he will refer to me as the PO and not the DPO! If you check out the "Matilda project" in the Photo album section of our site, you'll see pictures of this and other repairs.
http://www.holderness.info/
Chris
"Once a Matilda owner - always a Matilda owner"
--~--~---------~--~----~------------~-------~--~----~This message is part of the topic "Oak keel guides" in the Google Group "Matilda Sailboats"for which you requested email updates.To stop receiving email updates for this topic, please visit the topic at http://groups.google.com/group/Matildasail/t/ec552571cd84095d-~----------~----~----~----~------~----~------~--~---
MORE FROM CHRIS
From Matilda Forum (Guides for lifting keel - Nov. 7/2006)
I didn't want to cut the bottom slot since the cut would have to extend almost a foot up from the bottom - lots of fibreglass there on our boat. I also wasn't sure how to cut something that far up a narrow slot.
Chris
FROM MALCOLM BYARD ( THIS IS A TRULY INNOVATIVE SOLUTION- Lorne)
There is another solution....Having had similar problems (which nearly sank my Matilda) I was faced with this challenge. After consulting several boat builders (Spirit of Canada, Empire Sandy), I took a completly different route to this repair. I raised the boat up from a beam of my shop using two chain hoists and slings to remove the keel ( the keel is easy to move around by one person provided you employ ramps of 2x10 wiggle it up to bench height). Ground off all rust and applied epoxy to the pock marks to ensure a completely smooth surface. Faired the keel smooth. While the keel was out dug out most of the rotten bottom part of the track.
THEN,....Wrapped the keel with 1/8th thick casting wax sheets. Put the keel back into the boat. Sealed the bottom opening with plumber's putty.
(This is sure to raise a few feathers) I poured into the top of the keel .....Casting compound and pea gravel up to within 8" of the top of the inspection cover. The trick was releasing the wax after I had poured in the casting compound. It took some thought after the wax didn't let go after I had heated up the bottom. So I built a gantry inside the cabin and jacked out the keel from the inside using a small bottle jack. Then had to remove the wax gently with a scraper and light touch of the propane torch.
The result....A little more ballast as a result of the weight of the epoxy casting resin and gravel (as filler) and a better more stable boat. Many would argue this was a hack attempt but the boat is dry, the keel is true, and she sails much more solidly than she ever did before. This repair took place three years ago and it seems to be working well.
Now,...The disadvantage is, in twenty years or so when this repair may have to be done again, it will require a bloddy jackhammer to remove the casting compound. I did the inquiries to the specs of the compound and found it was not water permiable in this application and gravel is inert to water.
Sorry I did not photograph the proceedure. Seems to me it was slightly more expensive ($400) than replacing oak but I have been assured that the compound will endure more water exposure, keel scraping, and abuse than either wood or delrin (water impermiable plastic). Don't have the spec sheets handy but contact any casting shop and they can help you out with getting you the compound and the wax. Casting compound, unlike epoxy resin can be poured in depth without creating dangerous amounts of heat.
Good luck, happy sailing.
P.S. I will be installing a balanced keel pulley this winter on BOTH of my Matildas (great solution!!)
HYAK
--~--~---------~--~----~------------~-------~--~----~This message is part of the topic "Oak keel guides" in the Google Group "Matilda Sailboats"for which you requested email updates.To stop receiving email updates for this topic, please visit the topic at http://groups.google.com/group/Matildasail/t/ec552571cd84095d-~----------~----~----~----~------~----~------~--~---
Keith:Indeed the keel trunk had not come away from the top of the cabin. (must admit at the time had not considered the downward pressure). A couple of other items for this repair. The compound will leak out of the sink/icebox drain and the old trunk bolt hole if not plugged. Once the resin sets this drain had to be drilled out again which was fairly simple. You have to get the compound up and over the rotten section of guides at least 6-8 inches in order for the compound to have a good bite on the old oak. However, once set the lower section of the keel trunk is bullet proof from all angles and so far has provided solid support for both the cabin top and the keel itself. Removing the keel is also impossible after this repair. But I don't plan on undertaking this again in my lifetime on this boat (perhaps the new MATILDA).
HYAK
--~--~---------~--~----~------------~-------~--~----~This message is part of the topic "Oak keel guides" in the Google Group "Matilda Sailboats"for which you requested email updates.To stop receiving email updates for this topic, please visit the topic at http://groups.google.com/group/Matildasail/t/ec552571cd84095d-~----------~----~----~----~------~----~------~--~---
ANOTHER INNOVATIVE SOLUTION FROM MALCOLM BYARD
HYAK
Date:
Sat, Dec 9 2006 1:43 pm
Email:
"HYAK" macar...@gmail.com
I have a Matilda 20 keel that is currently out of my boat for a re-fit this winter. If you are interested you can have a look at it. Also, if you are anywhere near Toronto, there is a Matilda sitting in the yard at Toronto Hydroplane and Sailing club that has a modified keel on it. The owner "lost" the original keel in the lake. He cut a new plate and attached a wing type composite bulb to the bottom instead of the usual cast bulb. I spoke to him years ago and he claimed at the time that it was much more cost effective to bolt on this form and fill it with concrete than it was to have a new bulb cast. Check it out, a keel from Mars will be costly, you could get the "wing" forms from HMP i think and cut yourself a new blade. Might be worth investigating. macar...@gmail.com
Sunday, October 01, 2006 8:41 PM
Evening Onde,Your questions are
How do I assess the current state of my wood?
Did my previous posting contain sufficient suggestions for evaluating the status of your wood??
Does the boat have to be on a lift?
A lift is the only method I am familiar with to remove the centerboard in order to replace the centerboard guides. It is possible to tip the boat over on its side, provided the mast is in place [even then, it would take some fairly hefty persons to accomplish that] and pull out the centerboard but when you are dealing with a 300 lb object, it is nice to have gravity on your side.
Where are the guides inserted?
The guides are an integral part of the centerboard frame.
From Below?
Very little can be accomplished from below as the slot is only approx. 1" wide, with a lip on each side making it almost impossible to do much from below.
How are the guides attached to the oak frame that houses the keel?
The guides are a slot cut approx. ½" wide and approx. 3/4" deep in the oak frames.
Are they structurally integral?
ABSOLUTELY!!!!!!! The front guide supports the mast step and if the lower portion of the guide deteriorates to the point of not being attached to the fibreglass hull, the mast [thru shroud tension, etc.] will force the cabin top lower and lower in the hull, maybe even to the point that proper length shrouds would be too long for the available turnbuckle adjustment????
The restrainer bolt at the aft inside base of the keel housing was badly bent by the former owner of my boat. When I replaced the pin I discovered that the wood around the bolt was rotted. Does that bolt go to a guide or to some fixed post in the keel housing?
The limit bolt fits thru a hole in the wooden frame [to block the groove cut for the centerboard] and is also supported by a relatively thin layer of fibreglass on the outside of the frame. The wooden fibers, around the hole, may have been crushed by the impact of hitting something or, if the lower part of the front guide has worn sufficiently, the part of the centerboard above the limit bolt may have bent the limit bolt, each time the centerboard was lowered completely. In other words, the weight of the centerboard was held because the wire had reached the end of its travel, not the limit bolt as the limit bolt was being bypassed.
The 20-30 hours of labor...does it involve cutting and replacing fiberglass?
My personal opinion is that cutting and replacing fibreglass will result in a less than perfect finish as compared to the original fibreglass and that 20-30 hours is a very conservative estimate.
Do you have to break open the keel housing inside the boat or is it all done from below?
NO!!! it is not necessary to break open the keel housing. As stated previously, very little can be accomplished from below. In my opinion, the original white oak frame/guides were probably inserted in the hull, before the deck was attached to the hull. The wood was probably set into the resin/fibreglass mixture before it had set completely and as far as I know, this was the only bonding performed on the lower end of the wood.
In previous conversations with Chris Holderness, who recently replaced his centerboard guides, shaping the replacement frames to fit the original cavities for the frames lower ends was a challenging part of replacing the frames.
Hope these comments are of value to you.
Please feel free to contact me if I can be of further assistance.
CHEERS
LORNE--~--~---------~--~----~------------~-------~--~----~This message is part of the topic "Oak keel guides" in the Google Group "Matilda Sailboats"for which you requested email updates.
HERE IS ANOTHER APPROACH FROM GERRY BLACKWOOD
(e-mail dated Feb. 1/06)
Hi Lorne:
I have all the hardware to do the mods to my boat, they will have to wait until the weather gets better. I have found a good magazine called BoatWorks, it is full of good information for the hands-on sailor, found a good article on replacing the windows by Paul Esterle. About the keel tracks, I used 2"square nylon which I cut using a table saw and a router to cut the groove. The old tracks where cut in two parts just above the well opening from the inside, where the panel is removed to service the pulleys and cable, they came out with out a lot of force. The tracks have to be cut to fit into the wooden beam that carries the pulleys and the only way to reinstall the new ones was form the bottom outside, to do that I had to cut a 2" square hole in the center of the keel slot and inserted the new tracks, a piece of plywood cut to the with of the keel helped force the new tracks into place. The 5200 glue was applied to front of each track and I used 2" stainless steal screws,used above the waterline, to hold the tracks in place. The new tracks work great and I have not had any problems with them, a bit of grease and the keel slides up and down very easily, no more worrying about them rotting and I am sure they are just as strong as the wooden ones. I will let you know how I am doing once I get the boat in the water. I have been checking your Bloc for any up dates and found the article about the Cunningham (down haul) and will try it as well. With these changes to my boat I might try the Wednesday night racing again I have a 85 handicap, what do you think?
Gerry
From an e-mail from Gerry dated Nov. 26/2010
Hi Lorne:A lot has changed since I wrote that e-mail. The fall of 2006 I purchased a Pearson 26 and sold my Matilda Feb 07 and this August I purchased a C&C 29 mk1. Reguarding your questions, the 5200 worked fine and I used 2" stainless steel wood screws and never had any other problems while I own the Matilda. Hope that helps.Gerry
HERE IS another approach - creating a new centerboard out of fibreglass
Feb. 15/07
Lorne,
Wood worm is only suffered if you leave your boat sitting in mud for along period of time. No risk to fresh or salt water. Once you've got it the only way to rid yourself is remove the wood. Wood worm may be a local term for the problem.
The leading edge deteriorates because of a complement of the 10 deg. daggerboard angle and the off center of gravity placement of the daggerboard pullies. It is the lower aft end deterioration that has me stumped. It could be wear from a poorly working daggerboard or rust from non-use, and not require consideration with respect to refit.
My daggerboard solutions to date are
Move the lead ball forward by 3 to 4 inches to better allign the CoG to the center of the daggerboard. This will only marginally move the boat's CoG and this may not be a bad thing given that we are not featherweights and the cockpit is behind the boat's CoG.
Build a daggerboard plate out of 5/8 inch thick glass laminate. Polyester all layers and sheath the plate in one layer of epoxy glass.
Move the location of the pullies aft, as described by this groups members.
I don't want to rebuild the top member of the daggerboardbox frame but leaving the top pullies in their original position removes 50% of the benefit of moving the lower pullies back. I think.
Peter
On Feb 14, 1:15 pm,
Morning Peter&Mary,
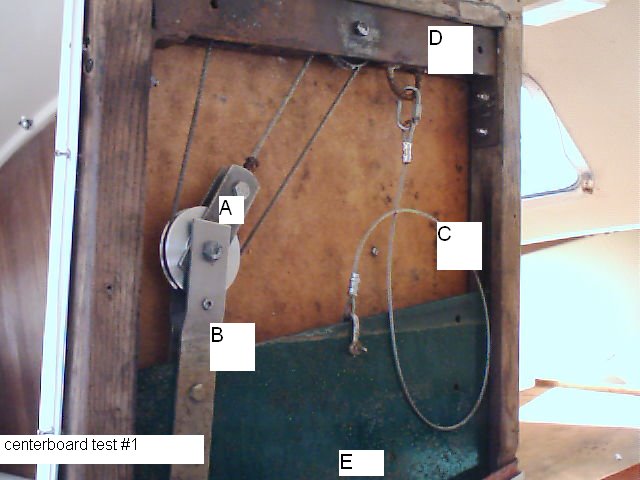
Really enjoyed the photos of your project boat. Your AZULITA is looking pretty good already. Your question on one of the photos "What causes the leading edge of the centerboard and the centerboard guides to deteriorate" might be answered by having a look at our blog http://pamsmatilda.blogspot.com/
under centerboard assembly test.
You might also have a look at our blog
http://matildacenterboard.blogspot.com/
where I have attempted to gather various approaches to solving the problems with MATILDA centerboards. The photo of the holes right thru the centerboard brings a whole new perspective to proper maintenance on a MATILDA centerboard. Is this a problem unique to salt water sailing?
Are wood worms unique to salt water or do they survive in fresh water as well?
GOOD LUCK on your renovations.
Cheers
LORNE
On Feb 11, 3:18 pm,
"Pedro" wrote:
Thanks to all in the group that have participated in the questions dealing with keel and wiring issues.
I work at a boatyard in Petie Riviere NS and have just starte renovating our, new to us, Matilda. There has been no maintenance done on Azulita for a very long time, we suspect since she was initially purchased 30 years ago.
Windows are frosted or blown out. Daggerboard is rotted right through to having holes in the plate. Wiring connections and lights are rusted, broken and nonfunctional. Hull has been hit by a car, and many other objects. Paint is original with a red strip appiled by walking a roller along the sheer. Daggerboard box has wood worm and totally rotted from the bottom up 7 inches.
But she's a beamy comfortable little boat that will serve us well. Hopefully after the winter renos she will be pretty, too.
http://www.dagleysboats.com/gallery/main.php/v/restore/album/
is where photos of the renos can be seen.
Peter & Mary
It will be interesting to see how Peter&Mary's approach to building a new fibreglass centerboard works out, Lorne
Here's an update on Peter's fibreglass centerboard.
From e-mail dated Sept 21/09(6:39am) from Peter&Mary
Hello Tony. I notice that your centerboard is carbon steel and has what appears to be serious rust. I fixed a Matilda 20 a few years back and replaced the centerboard with a fiberglass one. It works very well but was a lot of work. The corroded c/b had eaten away the front guide of the c/b box, which is a common problem I believe. I replaced everything except the pulleys and lead ball. I also took note of the redesign of the pulleys as noted in detail by one of the other members.
I also noticed that the boat is being stored on a trailer with the centerboard up. This puts all the weight of the centerboard on lead bottom on the hull and pulley and cable system.
This may contribute to the depressions on the hull surface, as seen in your photos.
The windows and deck hardware have caulking all over the fasteners, undoubtedly to stave off leaks. This method never works and I’ll suspect they all need to be removed, surfaces cleaned and reinstalled.
Prior to my purchase the boat had sunk to the bottom of the ocean, left there for the summer, haled out and left in the mud for a few years. Everything leaked. The centerboard had rusted totally though in 5 places. It was painted with what looked like house paint and a roller. Hit by a truck…. Etc.
Lots of work over one winter and I had a beautiful boat that works perfectly.
If you need to hire, the cost will exceed the value of a fixed up boat but if you’re handy ,and God knows we are!, you’ll have the biggest little boat around and at low cost.
Peter
From e-mail dated Sept 22/09(7:29pm) from Peter&Mary
Tony, my centerboard is solid glass and polyester resin. It is about 3/4" thick. I would not recommend this to the novice as it is tricky to ensure the board does not warp as you lay it up. I am a journeyman boatbuilder. The materials were available to me a low cost as I just used scrap glass for most of the layup. I would recommend another steel centerboard. Stainless if you have the budget. When you take the board off lay it on cardboard and track it out. Give this to a steel fabricator. Be sure to check the Matilda site for new pulley location recommendations, they work well.
When checking the interior, wiring can be in need of replacing. If you need nav. lights to sail in your area you’ll need to cost it out also.
I think the price of $2,500 or less is good. That’s what I paid for mine. Mine came with an old trailer that I had to replace the tongue, axel, wheels and wiring.
If you like to bury yourself in the garage till midnight working on stuff, you may get this boat ready by spring but if you just think you like to, but don’t actually get out to the garage often, add an extra $4k to the price and buy a ready to sail Matilda. The money will be the same in the end. The only thing you’ll miss is the satisfaction that comes from saving an old boat in disrepair and knowing you are sailing a boat that has a big part of you in it.
One of the good things that comes from a Matilda purchase is “this group”. I don’t participate in the chats very often but I did use the help and resources that they offer up. This is a very knowledgeable and helpful bunch!
Good luck on Wed.
Peter
ANOTHER APPROACH
(From Matilda owners website - May 29/08)
(From Matilda owners website - May 29/08)
Bill Ripley
View profile
More options May 21, 8:52 am
From: "Bill Ripley" ...@sympatico.ca>
Date: Wed, 21 May 2008 08:52:43 -0400
Local: Wed, May 21 2008 8:52 am
Subject: re: centerboard and attachments

Here are some pictures of my centerboard repair, the previous owner had hit something and damaged the joint between the trunk and the hull. He cut the floor out and had made it water tight with putty. The guides were deteriorated as well so I cut the side out of the trunk, installed the new guides and then glassed the trunk back together. It was a lot of work but simple to do the fitting etc. with the trunk open and I have a much stronger boat than the original. I did a mat, roving, mat layup on the joint. There will be cosmetic work on the trunk but that will have to wait for another year.
Bill Ripley

Trunk side removed

Guides installed and ready for glassing

Guides glassed in and ready for finishing
WEAR
One must question whether the wear is excessive enough to warrant replacement of the guides or can some other solution allow the current structure to remain in place, IF, a way was found to keep the situation from deteriorating. Any solution to the problem of centerboard guide wear must consider the problem of whether you are solving the problem or merely solving a symptom of that problem.
My personal opinion is that, with the "TAIL HEAVY" centerboard, the problem is the enormous pressure of 160 lbs exerted against the lower front guide. This design flaw causes the front guide to wear at an accelerated rate. I don't believe the "EARLY" centerboard guides wear as rapidly.
Replacing the guides using the original pulley system solves the immediate problem of the guides being worn but the problem is doomed to repeat itself as the reason for the rapid deterioration has not been eliminated.

We have changed our pulley system to the "BALANCED" system for the last three years and have not experienced any problems.
For additional information, see
http://pamsmatilda.blogspot.com/
under CENTERBOARD ASSEMBLY TEST
8 comments:
Having just purchased a Matilda 20, I am planning to do some of the fabrication for this fix over the winter. One thing I am concerned about is in your implementation you seem to have raised the point of support to a position above the left mounting hole. This would tip the centerboard somewhat backwards (perhaps insignificantly). I would be inclined to try to have the pulley as close to the top of the centerboard as possible. I will likely have someone fabricate the overhead steel support structure. Any additional tips would be much appreciated. Great site. Very impressive work.
Evening Tom, The balanced cenerboard concept only works on "TAIL HEAVY" centerboards. If you lift a centerboard, with the attachment point between the two pulley straps, you will find that the board hangs with the bottom forward. If you push against the front of the board, you will find that it takes approximately 160 lbs of effort to make the board hang vertically. That pressure is grinding up and down against the front centerboard guide. The overhead steel support was put in by a previous owner because of a crack in the top frsme.
Cheers
Lorne
Right. My centerboard is a tail heavy. It is actually one of the boats you are familiar with from Wildwood - Norsuvic. Your fix makes perfect sense to me in principle. I would think the overhead steel support (or something similar) is required for this modification.
Afternoon Tom, The steel support was installed by a previous owner, because of a cracked frame member, not as a result of the balanced system concept. If the top frame member is in good shape, the steel support should not be necessary as you are lifting the same amount of weight (300 lbs).
Hi Lorne, you could be right, and I do value your opinion. Do you know of any boats that have done this mod just with the oak support and original overhead pulleys/mounts? The distribution bothers me a little. Same weight but not evenly spread across the top. Also two pulleys, and particularly their mounts, are taking the same load that 3 had before. There isn't a way to really strengthen the mounts without beefing up the support underneath. I don't see a significant downside to adding the steel support apart from being a little more work and weight.
Thanks
Tom
Afternoon Tom, I appreciate your concern regarding the integrity of the top frame member. It is certainly not going to cost a great deal in time and effort to ensure the top frame is adequately supported. I have had several individuals express an interest in the BALANCED concept but have not heard back of anyone who changed other than ourselves. Good luck with your efforts.
Cheers
Lorne
P.S. When you have a moment, you might consider sending your URL to mulhollandlp@quadro.net as we have photos of the previous owners you might enjoy.
Tremendous issues here. I am very satisfied to peer your article. Thanks a lot and i am looking ahead to touch you. Will you kindly drop me a mail?
Would be happy to send you an e-mail if I knew your address. Anonymous comments are difficult to reply to.
Cheers
Lorne
Post a Comment